In this post we will cover how to increase disk space for a VMware virtual machine that is using a Linux native partition rather than logical volume manager (LVM). Firstly we will increase the size of the virtual disk on the virtual machine at the hardware level and then once this is complete we will boot into a GParted live CD and perform the changes required to make use of the additional disk space so that the operating system is able to use it.
As there are a number of different ways to increase disk space I have also posted some different methods here:
- How to Increase the size of a Linux LVM by expanding the virtual machine disk – In this article the virtual disk that is using LVM is expanded, whereas in this current article we are instead increasing the virtual disk and expanding the Linux native partition.
- How to Increase the size of a Linux LVM by adding a new disk – In this article a new virtual disk is added to the virtual machine, a new partition is created, the volume group and logical volume are both expanded and then the filesystem is resized.
- How to Decrease the size of a Linux LVM – In this article the file system is shrunk followed by the LVM, allowing you to reclaim space in the volume group.
Important Notes: During the time that the GParted ISO is mounted you will be booted into this live CD rather than your normal operating system, basically meaning that during this process there will be down time from normal server operations.
Be very careful when following this article as this process has the potential to cause a lot of damage to your data. If you are working with virtual machines make sure you take a snapshot of your virtual machine beforehand, or otherwise have some other form of up to date backup before proceeding. Note that a snapshot must not be taken until after the virtual disk has been increased in the first step below, otherwise you will not be able to increase the disk until it has been removed. It could also be worth cloning the virtual machine first and testing out this method on the clone.
Prerequisites: You will need to download the GParted live CD ISO file so that you can use it later, you can get this here.
Throughout my examples I will be working with a VMware virtual machine running Debian 6, this was set up with a 20gb disk and we will be increasing it by 10gb for a total final size of 30gb.
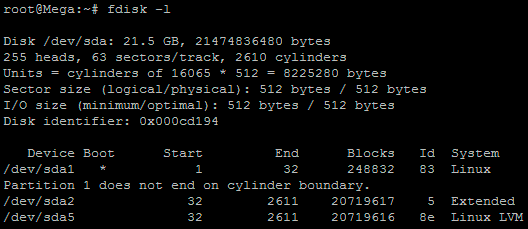
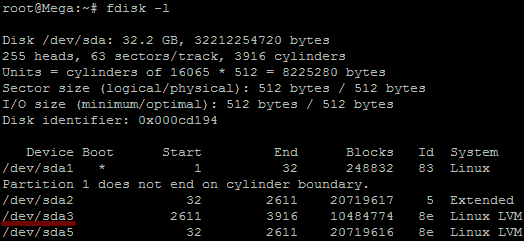
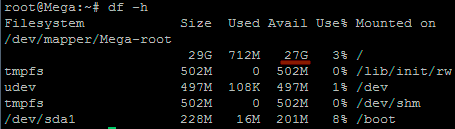
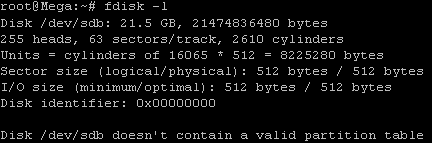
Below is an image displaying disk information on the server before we begin.
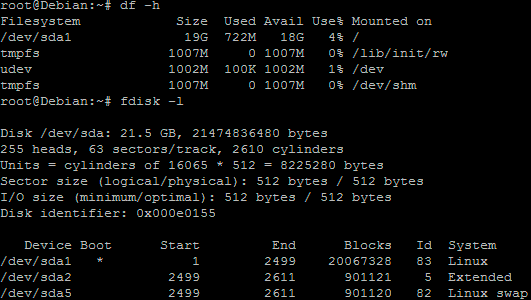
It is important to identify that you are actually using a Linux native partition – as this is what we are extending. As you can see in the above image /dev/sda1 is listed as “Linux” and it has the ID of 83. The 83 hex code shows that it is a Linux native partition, while 8e shows a Linux LVM. For information on increasing a LVM please see the linked posts above.
Note that /dev/sda1 is the partition we will be expanding.
Increasing the virtual hard disk
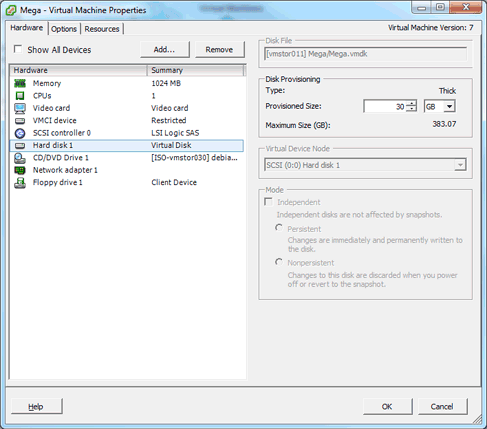
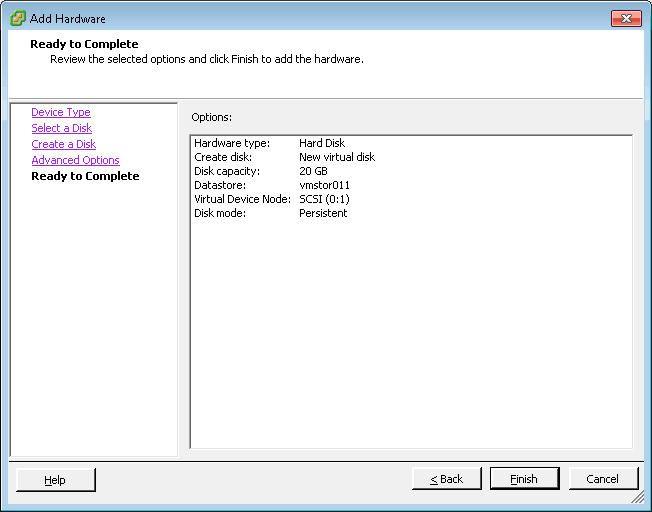
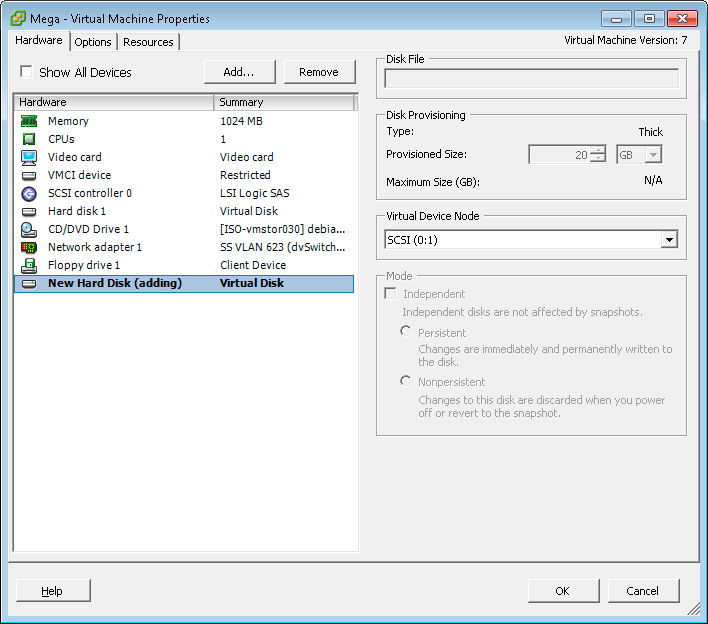
First off we increase the allocated disk space on the virtual machine itself. This is done by right clicking the virtual machine in vSphere, selecting edit settings, and then selecting the hard disk. In the below image I have changed the previously set hard disk of 20gb to 30gb while the virtual machine is up and running. Once complete click OK, this is all that needs to be done in VMware for this process.
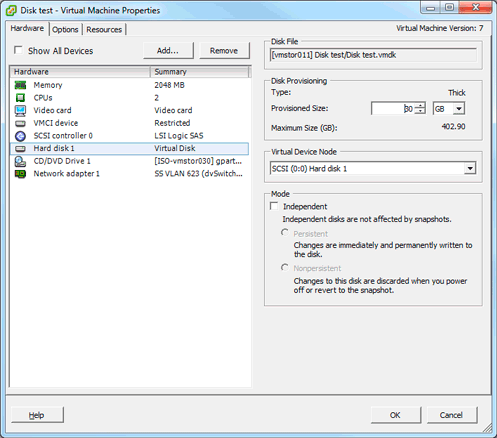
If you are not able to modify the size of the disk, the provisioned size setting is greyed out. This can happen if the virtual machine has a snapshot in place, these will need to be removed prior to making the changes to the disk. Alternatively you may need to shut down the virtual machine if it does not allow you to add or increase disks on the fly, if this is the case shut down and make the change, do not power the virtual machine back on at this stage as next we mount the GParted ISO.
Booting into the GParted Live CD
Now that we have increased the hard disk space of the virtual machines, we need to boot into the GParted live CD to continue, you can download this here.
Right click on the virtual machine in vSphere and select “Edit Settings” to bring up the properties.
Select the CD/DVD Drive and then select your GParted ISO, in this instance I have already uploaded this file to the datastore so I have just clicked the browse button to select it. Make sure that connect at power on is ticked.
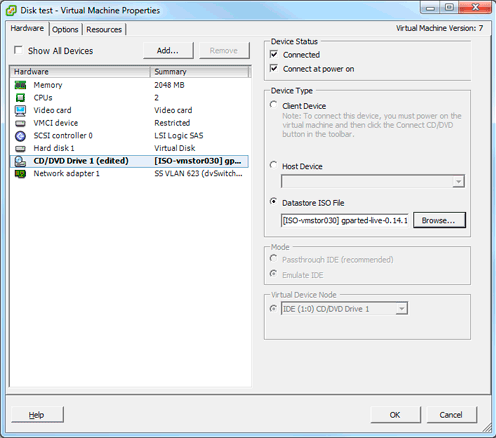
I have also selected for the boot options to be presented on the next boot so that I can select to boot into the ISO easier. You can also adjust the time to delay the boot so that you have appropriate time to select that you want to boot from CD, in the below image this is set to 5 seconds, and force to boot into bios is enabled so that I can select to boot from CD on next boot.

Now we are ready to power on the virtual machine (if your virtual machine was still on, shut down and power on), I have done this using some older versions of GParted in the past and it is worth noting that over time the GUI has changed so the following images may look a little different for you. I am using the current latest version of the live CD, version 0.14.1-1.
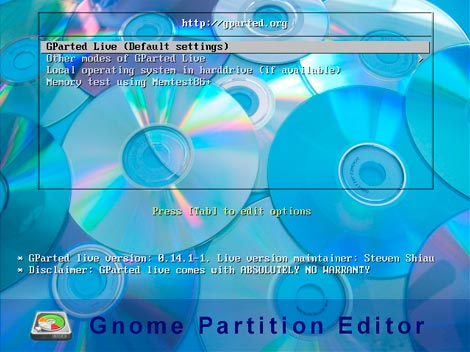
Once the virtual machine has powered on and you have booted to the CD, you will be presented with the following menu, just press enter to boot into GParted Live (Default Settings).
After some time you will then arrive at the following screen, for this I did not change anything and just accepted the defaults by pressing enter.
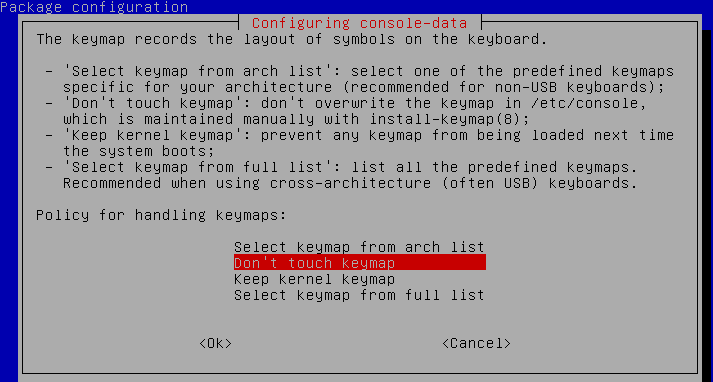
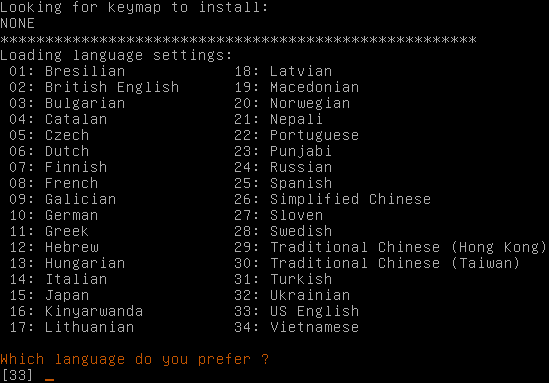
You will then be prompted to select a language, pressing enter defaults to English.
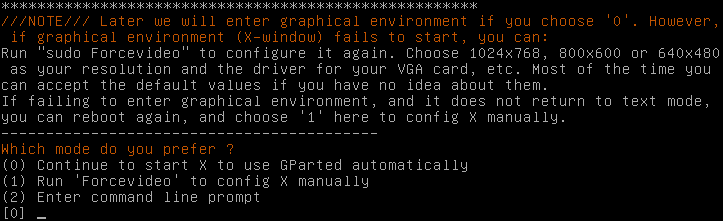
Next we select the default option 0 by pressing enter as we will be working with the GUI.
Once complete you will be presented with the GUI with GParted already open, if it is not already open you can select it from the Desktop icon.
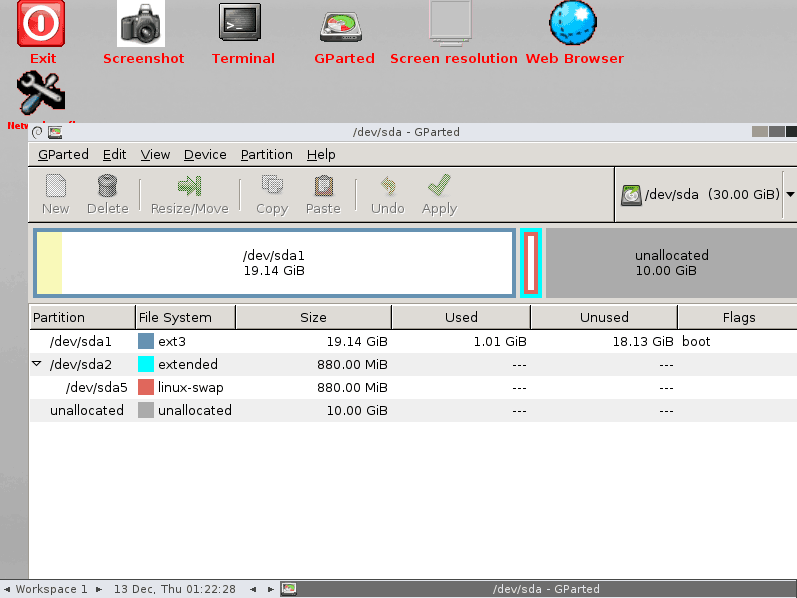
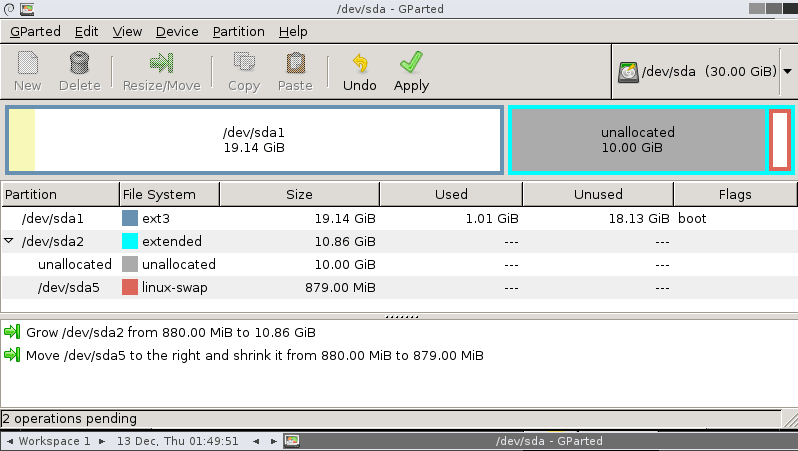
As you can see the original /dev/sda1 partition that is making use of the 20gb disk is there, as well as the new unallocated 10gb from when we increased the size of the virtual hard disk earlier. The space between the two is the swap space. The total /dev/sda disk size of 30gb is also shown.
What needs to be done now is get /dev/sda1 to take up that unallocated space, this is not currently possible because swap is in the way so we need to move things around. If you do not have swap in between the partition to be extended and the unallocated space then you will be able to skip down a few steps until you arrive at the image where /dev/sda1 and the unallocated space are next to each other.
First we select /dev/sda2 which is the extended partition containing the swap, we want to expand this to include the 10gb of unallocated space.
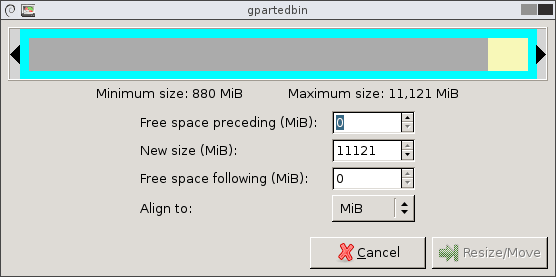
Select /dev/sda2 and click “Resize/Move” and you will be presented with the following.
Basically you just need to drag the black arrow of /dev/sda2 all the way to the end of the unallocated space and click the Resize/Move button.
After doing this, you should see /dev/sda2 (represented by the blue box) spread out over the unallocated space.

This change and all further changes will not yet be applied, you can see the tasks down the bottom of the GParted interface and these will be applied only once you click the Apply button. Alternatively you can click the Undo button to remove a pending change.
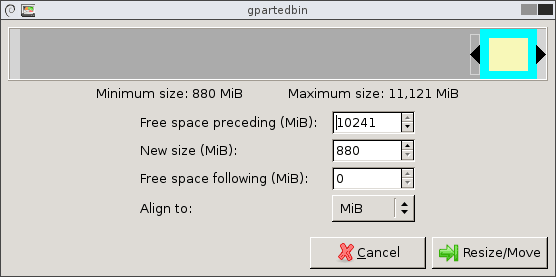
This time we want to select /dev/sda5 which is the swap partition and select Resize/Move, this will result in the following.
This time rather than expanding the partition, we want to just move swap all the way to the end of the /dev/sda2 space that it is in, this is done by just dragging the box to the end which will then look like this.
Click the Resize/Move button and then a warning may appear informing you that moving a partition might cause your operating system to fail to boot. It also warns that performing this move may take a long time to apply, read the warning then click OK to continue.
The GUI should now look something like the below image, where /dev/sda1 is located right next to /dev/sda2 which contains the unallocated space.
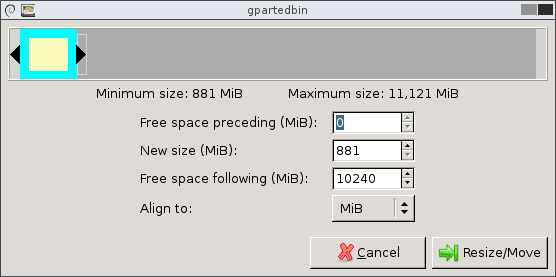
Select the /dev/sda2 extended partition and click Resize/Move.
Drag this to the right so that only the swap space is contained and the grey unallocated space is freed, click Resize/Move once complete.
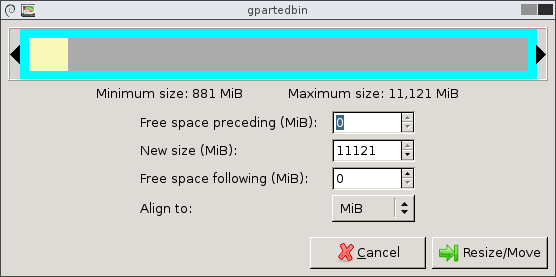
Once this is complete the disk will look like this.

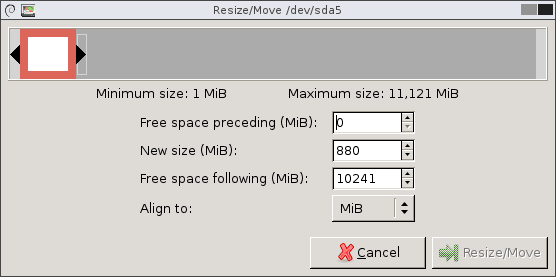
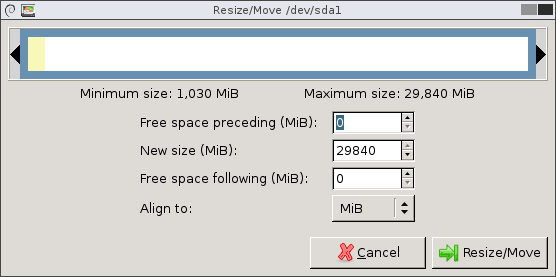
Now we have /dev/sda1 next to the unallocated space so we are finally ready to expand /dev/sda1. Select /dev/sda1 and click the Resize/Move button.
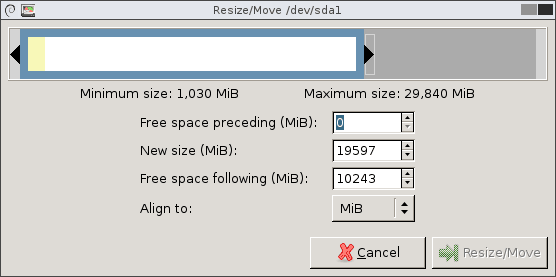
You will be able to perform this action straight away if you did not have swap in between /dev/sda1 and the unallocated space, the previous steps were to get swap out of the way in GParted.
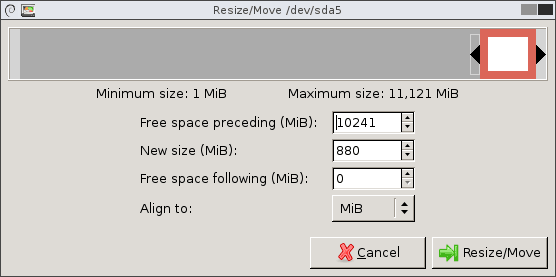
Drag the arrow over so that the unallocated space is then consumed by /dev/sda1 as shown below, then click Resize/Move.
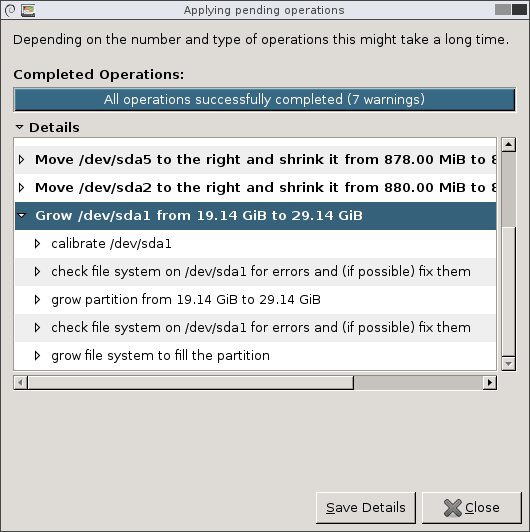
Once this is done the /dev/sda1 partition will now be using the unallocated space that was previously there. All that is left to do is click the apply button which will apply the changes – you will be prompted to confirm with a warning that data loss may occur.
Note that this may take a while depending on how much of the disk is currently in use and the amount of disk space you are increasing, because a file system check (fsck) is run before the expansion and after it to ensure that there are no issues. I have performed this method on a 400gb server in the past and to increase it 100gb took approximately 5 hours. In this example I am only increasing by 10gb and there is only about 1gb of data on the disk so this took approximately 2 minutes to finish applying.
Once complete you will see something similar to the below image, you will be able to click close once finished.
Everything is now finished, you just need to reboot the virtual machine and then boot from disk rather than CD, alternatively shut down the virtual machine and unmount the live CD and then power it back on.
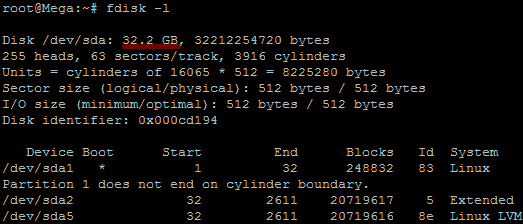
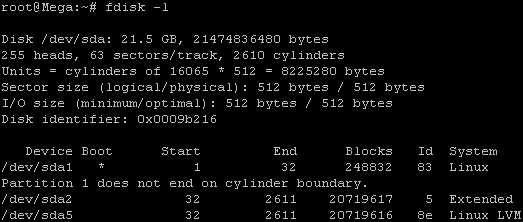
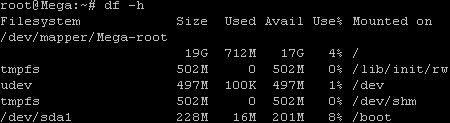
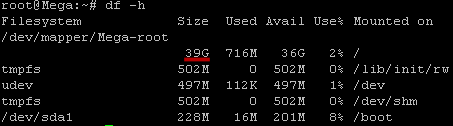
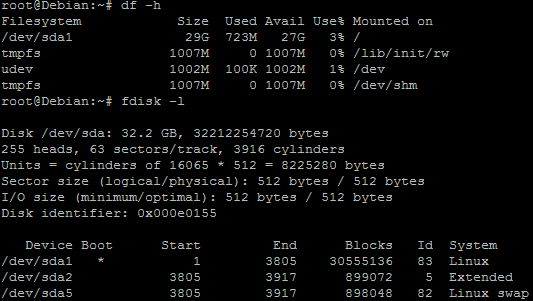
Once the operating system has booted you can confirm that the disk space has expanded correctly. Below you can see that /dev/sda1 is now 30gb in size.
Summary
With this method we have increased the virtual hard disk drive through VMware, booted into a GParted live CD ISO and expanded the primary Linux native partition over the unallocated space, resulting in overall disk space being increased successfully.